How to track groups of pages as separate websites using Matomo Tag Manager
With Matomo, you can track specific groups of pages as separate websites (site IDs) with each site getting its own analytics reports (while still under one domain). This setup is ideal where you have a single website with groups of pages that operate as multiple units or departments on a shared website. For example:
- A university needs separate analytics for different faculties:
uni.com/business/anduni.com/law/. - An Ecommerce store has several brands under the same domain, with each brand manager wanting their own view:
store.com/brand-A/andstore.com/brand-B/. - A company requires analytics for business units:
example.com/finance/,example.com/consulting/andexample.com/technology/.
By creating separate websites in Matomo, each group/business unit gets its own Site ID, MTM container, and controlled access to the right data.
This guide explains how to configure Matomo to track groups of pages as individual websites using Matomo Tag Manager (MTM).
Add a website for each group
The first step is to create a separate website in Matomo for each group of pages.
- In Matomo, go to Administration
 > Websites > Manage.
 - Create a new site for each group using the exact subpath for the group, e.g.
https://example.com/finance/.
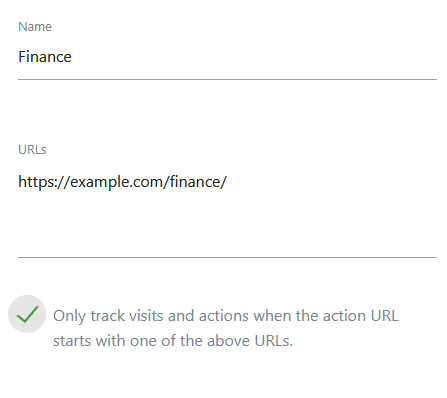
- Select the option, Only track visits and actions when the action URL starts with one of the above URLs. This will ensure the site only tracks visits to the pages located under the subpath e.g,
/finance/. - Define the site settings and click Save.
- You will be prompted to install Matomo on the specific group of pages. Select to install with Matomo Tag Manager and the Tag Manager tracking code will be displayed.
- Copy the code and paste it in the
<head>tag of the pages you want to track that are located in the specified subpath e.g,/finance/. - Once you have added the Tag Manager tracking code to the relevant pages, open the subpath URL in your browser.
- When the first tracking request is sent, it automatically completes installation and the site’s dashboard will open in Matomo.
- To continue setting up the sites, repeat steps 1-7 for each group/business unit.
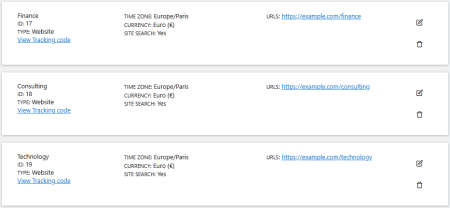
- Ensure that the correct code is placed on the pages for each group. For example:
- On
/finance/pages, include the tracking code for Site ID 17. - On
/consulting/pages, include the tracking code for Site ID 18. - On
/technology/pages, include the tracking code for Site ID 19.
- On
Configure the Tag Manager containers
A default Matomo Tag Manager (MTM) container is generated for each new site, which is automatically published when you first install the Tag Manager tracking code on your web pages. You can customise tracking and modify the containers as required.
If you want to keep the different containers consistent across the groups, it may be easier to make changes in one container and copy the updated elements or the entire container to the other sites. Learn more about copying containers and Tag Manager components.
Set User Permissions for the Tag Manager containers
As an Admin or Superuser, you can assign permissions to users who will manage the containers for the newly-created sites.
- In Matomo, go to Administration > System > Users.
- Create a new user or select an existing user and go to Permissions.
- Assign the user Write or Admin access. This will enable additional capabilities for Tag Manager permissions.
- Select the relevant permissions for the user and click Save.
This setup ensures only specified users can manage the tracking configuration and reports for their group of pages/business unit.
Consent manager integration across grouped webpages
When integrating Matomo Tag Manager and a consent manager (CMP), consent is stored at the domain level and applies across all pages. However, if visitors land directly on a group/business unit’s page instead of the main site, the group’s container must also be able to request and respect consent. To configure this, follow the steps below:
- Set up the consent manager integration in the main site’s MTM container.
- Copy the consent-related tags from the main site’s container into the business unit containers, so the consent manager widget displays no matter where the visitor enters.
- In every container, configure consent in the Matomo Configuration variable and select either Require cookie consent or Require tracking consent (depending on your consent approach).
Once consent is given, the choice is shared across the domain, so the visitor will not be prompted again as they navigate between different groups of pages. They will be able to access the CMP widget to change consent if needed.
Tracking pages excluded from defined groups
If you want the main site to track pages that do not belong to any defined group, ensure the main site tracking code does not run on any of the group pages.
If you need an overall view across all group pages and the main site, you can use Roll-Up Reporting. This lets you add the business unit websites (and the main website, if needed) to a roll-up website to aggregate data while still allowing drill-down by individual site. Learn more about Roll-Up Reporting.
For alternative approaches to reporting on grouped pages, refer to the developer documentation and this FAQ, which covers multi-website and custom dimension methods and