
Integrate Matomo Tag Manager with Modern SharePoint Pages (SPFx Extension)
For modern SharePoint pages, you can add Matomo Tag Manager using a Microsoft-supported SharePoint Framework Application Customizer. This integration does not require a third-party Script Editor web part or plugin.
A SharePoint developer can create an SPFx Extension that loads the Matomo Tag Manager container script in the Application Customizer’s onInit() method. The packaged extension can then be deployed through the SharePoint App Catalog and applied to specific sites or deployed tenant-wide.
This advanced guide applies to modern SharePoint pages and it is intended for SharePoint administrators and developers who want to deploy Matomo Tag Manager (MTM) using a SharePoint Framework (SPFx) Application Customizer.
For compatibility requirements and more detailed information on SharePoint Framework (SPFx) development, project structure, debugging, and deployment, refer to the following Microsoft documentation:
- Set up your SharePoint Framework development environment
- Build your first SharePoint Framework Extension
Before you start
To prepare for the setup, ensure you have the following:
- SharePoint administrator access with permission to deploy SPFx solutions.
- A Matomo website configured for your SharePoint site and note the site ID.
- A published Tag Manager container.
- The MTM container URL found in the Tag Manager container > Install code instructions.

- Install Visual Studio Code or another code editor and use a modern web browser.
Set up your SharePoint Framework development environment
- Install
Node.jsusing the LTS version supported by your SPFx version. - Install the Microsoft SharePoint Framework (SPFx) development toolchain. You can install all three tools using one command, or install them separately.
-
To install all tools, Heft, Yeoman, and the SharePoint Framework generator:
npm install @rushstack/heft yo @microsoft/generator-sharepoint --global -
Alternatively, install each tool separately:
- Install Heft. Microsoft’s build system for SharePoint Framework projects. It is used to build, package, and deploy SPFx solutions.
npm install @rushstack/heft --global - Install Yeoman. A project scaffolding tool that creates the initial SPFx project structure.
npm install yo --global - Install the SharePoint Framework generator. A Yeoman extension used to create SPFx projects, including Application Customizers, web parts, and extensions.
npm install @microsoft/generator-sharepoint --global
- Install Heft. Microsoft’s build system for SharePoint Framework projects. It is used to build, package, and deploy SPFx solutions.
-
During installation, npm may display warnings about deprecated packages. These warnings are common when installing the SPFx toolchain and do not necessarily indicate a failed installation.
- To verify that the development environment is configured correctly, open a new terminal window and run the following commands:
node --version
npm --version
yo --version
npm list -g @microsoft/generator-sharepoint
If all commands complete successfully, continue to the next section to create the SPFx Application Customizer project.
Optional
-
If you plan to test the extension locally using
heft start, you may need to trust the SharePoint Framework development certificate. This is only required for local debugging and was not needed for deployment testing. -
Configure the
SPFX_SERVE_TENANT_DOMAINenvironment variable if you plan to use the SharePoint hosted workbench or local debugging scenarios. This setting was not required for the deployment steps covered in this guide.
Create a new SPFx Extension project
- Create a new project directory, for example,
app-extension. - Open the project directory in a terminal window and create a new extension:
yo @microsoft/sharepoint -
You will be prompted to answer questions, for example:

- What is your solution name?:
app-extension - Which type of client-side component to create?:
Extension - Which type of client-side extension to create?:
Application Customizer - What is your Application Customizer name?
HelloWorld
- What is your solution name?:
-
In the terminal window, open the code editor:
code . -
Open the generated ApplicationCustomizer.ts found in
src/extensions/[your-app-name]/[YourAppName]ApplicationCustomizer.ts. -
In the properties interface, replace
testMessage: string;with:containerUrl: string;.

-
Replace the contents of
onInit()with the MTM container script logic. - Replace
https://YOUR-MATOMO-DOMAIN/js/container_XXXXXXX.jswith your MTM container URL.
import { Log } from '@microsoft/sp-core-library';
import {
  BaseApplicationCustomizer
} from '@microsoft/sp-application-base';

const LOG_SOURCE: string = 'HelloWorldApplicationCustomizer';

export interface IHelloWorldApplicationCustomizerProperties {
  containerUrl: string;
}

export default class HelloWorldApplicationCustomizer
  extends BaseApplicationCustomizer<IHelloWorldApplicationCustomizerProperties> {

// Add the MTM Container script //

  public onInit(): Promise<void> {
    Log.info(LOG_SOURCE, 'Initialized Matomo Tag Manager loader');

    const containerUrl =
      this.properties.containerUrl ||
      'https://YOUR-MATOMO-DOMAIN/js/container_XXXXXXX.js';

    if (!document.querySelector(`script[src="${containerUrl}"]`)) {
      const script = document.createElement('script');
      script.src = containerUrl;
      script.async = true;
      document.head.appendChild(script);
    }

    return Promise.resolve();
  }
}
Build and package the SPFx solution
- Build the project.
heft build - Bundle it for production. Running heft package-solution without the
--productionflag could generate a warning and ignore the includeClientSideAssets setting.
heft package-solution --production - The package will be created and saved under the project folder
/app-extension/sharepoint/solution/app-extension.sppkg
Deploy the package to SharePoint
- Log in to SharePoint with admin access.
- In the SharePoint admin center, go to More features > Apps > Open.
-
Upload the package solution .sppkg file to the SharePoint App Catalog. Refer to the Microsoft deployment guide for site-specific and tenant-wide deployment.

-
Click Enable app.
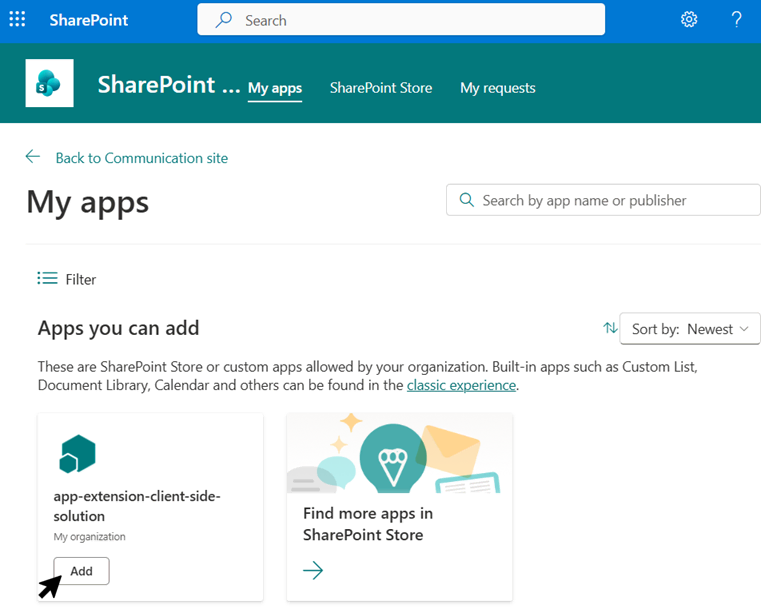
- Open the SharePoint site that you want to track.
-
Go to Settings > Site contents > New > App.

-
Select the package solution file .sppkg uploaded in the SharePoint admin center.
Test tracking with the SPFx extension
- Open a browser and launch the browser developer tools.
- Go to your SharePoint site and in the dev tools > Network tab, look for
matomo.phpandcontainer_requests. - In Matomo, check the Real-time visits report to confirm tracking is received.

Troubleshooting
1. SPFx project creation fails with a node-sass build error
If project creation fails with a node-saas error, verify that you are using a Node.js version supported by your SharePoint Framework (SPFx) version.
error code 1
error path ...\node_modules\node-sass
error command ... node scripts/build.js
Switch to the Node.js LTS version recommended by Microsoft for the installed SPFx version to resolve this issue:
- Delete the failed project folder, or remove the following files and folders:
node_modulesandpackage-lock.json - Install a Node.js version supported by your SPFx version.
- Recreate the SPFx project and reinstall the dependencies.
2. The Matomo Tag Manager container loads, but no visits appear in Matomo
If the container script loads successfully but no visits are recorded:
- Verify that the Matomo Analytics tag has been added to the container.
- Confirm that the tag is assigned to the Matomo configuration variable with the correct Matomo URL and Site ID.
- Publish the latest version of the container.
- Check the browser dev tools > Network tab for
matomo.phprequests.
3. The package uploads successfully but cannot be added to a site
SharePoint displays the error: Couldn't add this app. Check your network connection and try again. when SharePoint has an older version of the extension after uploading a new .sppkg file.

Change the solution version number in config/package-solution.json then rebuild, repackage, and upload the solution again.