Set up login with SAML authentication
Matomo SAML authentication module allows users to login to Matomo using SAML Identity Provider (IdP). If you have a federated environment with a SAML Identity Provider (OneLogin, Okta, Ping Identity, ADFS, Google, Salesforce, SharePoint…), you can use this plugin to inter-operate with it thereby enabling SSO for your Matomo Analytics users.
SAML is a premium feature which is included in our Cloud-hosted Enterprise plan or you can purchase it on the Matomo Marketplace if you self host Matomo On-Premise. Learn more about all the benefits and features of Login SAML.
Installation
Requirements
- PHP >= 5.5.9
- Matomo >= 3.x
- Purchase the plugin from the Marketplace SAML Plugin page.
- Note: When configuring SAML for your Matomo instance and adding users through SAML, you will be required to agree to the privacy policy and terms & conditions of Matomo on behalf of these users. Please note that individual users will not be asked to agree to these terms separately. It is your responsibility to ensure that all users added through SAML are aware of and comply with Matomo’s privacy policy and terms and conditions.
Installation
Install the plugin according to our plugin installation guide
Configuration
To configure SAML authentication follow these steps:
-
Login as a Super User.
-
On the Administration > Plugins page, activate the LoginSaml plugin.
-
Navigate to System > SAML page

-
Enter and save settings for SAML: add the Identity Provider info, set the attribute mappings and configure the other options as applicable.
-
Share Service Provider metadata with the IdP administrator.

-
Enable the SAML authentication.

-
You can now open a new browser session and try to login with the SAML Identity Provider.

SAML Configuration support
Configuring SAML Authentication properly can be difficult so we offer our services to help you get Matomo Analytics successfully working with SAML and enjoy the great benefits of SSO. Learn more and contact us in the SAML Support page.
SAML plugin settings
Now that you know the main configuration steps, let’s provide details about the SAML configuration.
Status Settings
Once you activate the SAML plugin, you are able to access its settings panel.

In Status Settings section you see Enable SAML authentication is disabled. When disabled, all SAML actions are disabled and if users try to execute them, they will receive an error notifying that the SAML functionality is disabled.
You may only enable it when the rest of the SAML settings are properly configured.
In SAML, there are 2 different kind of entities:
1. the Identity Providers IdP (the 3rd party entity where the user is authenticated), and
2. the Service Provider SP (the service that protect the app, in this case Matomo).
A circle of trust is defined between IdP and the SP, allowing all IdP users to access the SP under some conditions. That circle of trust is based on the exchange of an XML, named metadata, that describes the Entity ID, the entity endpoints and the public certificates (that will allow validation of signed/encrypted SAML messages).
Identity Provider Settings
In the Identity Provider Settings section, register the Identity Provider metadata.
You can directly fill the form:
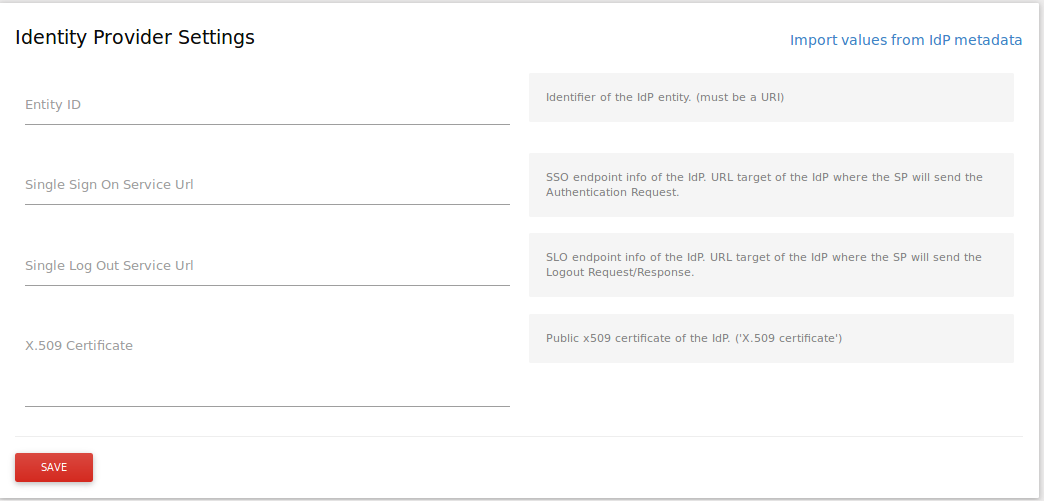
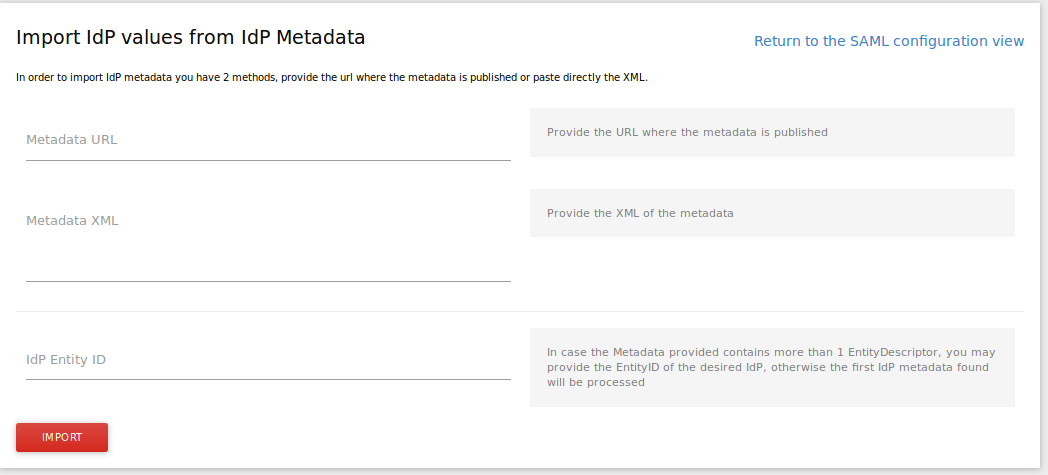
or click on the Import values from IdP metadata link:

This link will redirect to a form where two different methods are offered to let you import the Identity Provider metadata:
- By metadata URL
- By string XML
In case the imported metadata contains more than 1 Identity Provider entity description, you can use the IdP entity ID to identity the desired entity:
Option settings
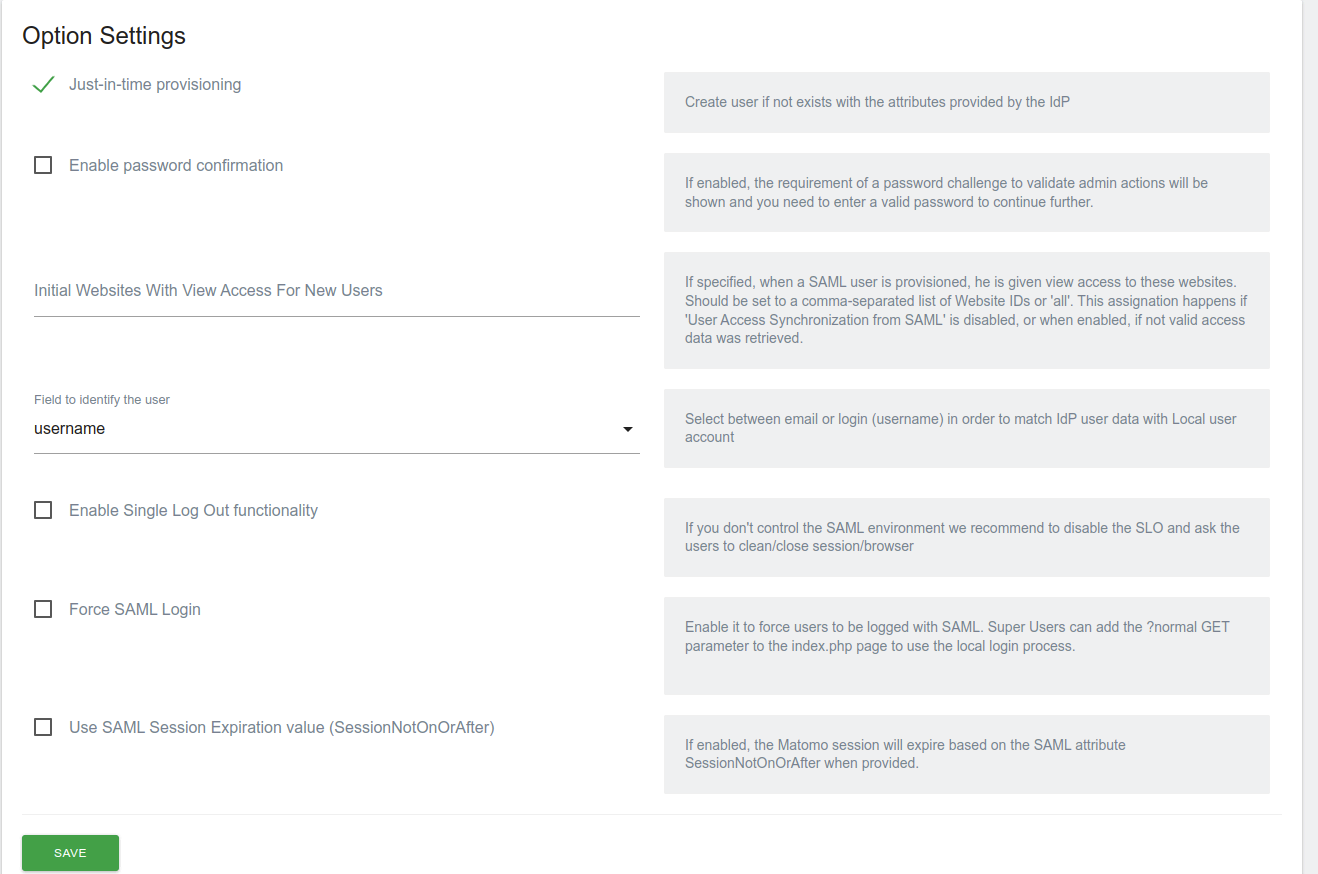
In Option settings section, define how the Matomo SAML integration will act.
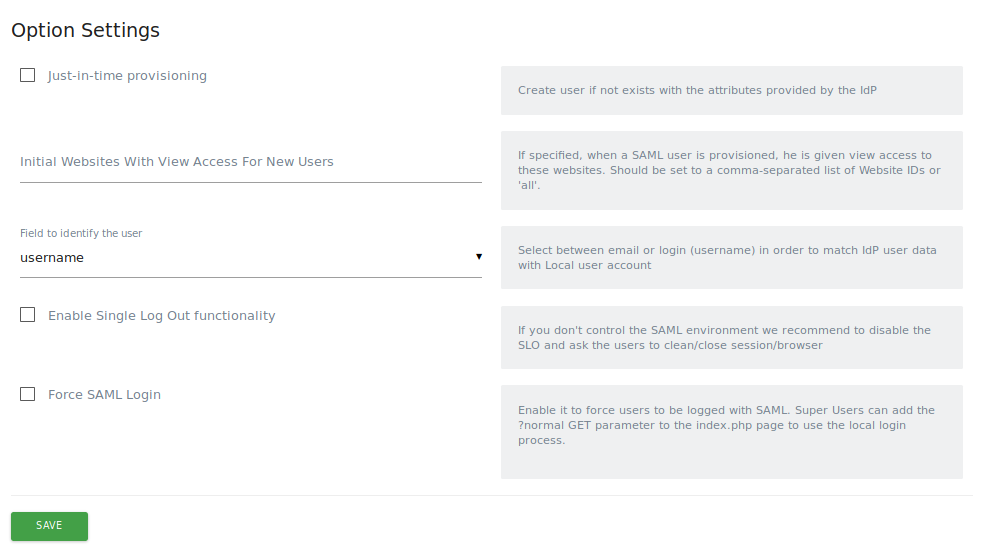
In some scenarios it makes sense to enable the Just-in-time provisioning when you want to automatically create user accounts based on the data provided by the Identity Provider on the SAMLResponse.
-
If just-in-time provisioning is disabled or the required user data is not provided, an error will happen during the SSO process since we will not be able to initiate any Matomo account.
-
If just-in-time provisioning is enabled, by default any new users (created with just-in-time provisioning) will have no access to Matomo. You may set a default
viewpermission to some Matomo websites. (What is the ‘view’ permission in Matomo?). Use the Initial sites with view access for new users to set a list of the Matomo Website IDs that the users will be able to view by default (comma separated list of Website IDs). -
When using just-in-time provisioning for Super Users, you will need to set a password for the user once created using a local Super User account (Or a Super User that has a local Matomo password already set) to use all functions of the Super User account such as Installing/Activating plugins and User Management.
This can be done by going to Settings > Users > clicking the Edit button > typing in the new password in the Password field > and then clicking Save Basic Info.
To identify your Matomo user accounts, you need to set a value on the Field to identify the user. By default the email field will be used, but you can select username and the Matomo username field will be used.
You may also enable or disable the single logout functionality. Note that if you disable it, the Single Logout Service data will be not published on the Service Provider metadata.
You can also force users to use SAML authentication by enabling the Force SAML Login setting. Doing this will redirect all users directly to the Identity Provider, so the Matomo login screen will never be displayed. Super Users will still have to login normally to, for example, configure the SAML plugin. Super Users can login through the Matomo login screen by appending ?normal to the URL when visiting Matomo. Note: Other users will not be able to login this way.
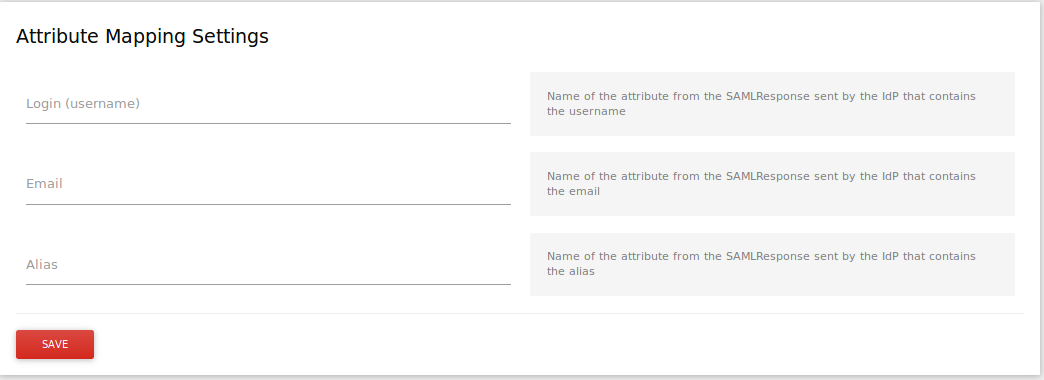
Attribute Mapping Settings
Depending on the values of Field to identify the user and just-in-time provisioning, the fields of the Attribute Mapping Settings section will be either required or optional.
- If just-in-time is enabled, all mapping fields will be required.
- If just-in-time provisioning is disabled then only the field related to the value of Field to identify the user will be required.
Identity Providers send the user data to the Service Provider with the custom attribute names, so you can use the previous form to map names between IdP and Matomo. For more information on attributes, refer to the official Microsoft documentation.
Access Synchronization settings
In the Access Synchronization settings section you can enable the user access synchronization from SAML attributes.

LoginSAML supports synchronizing access levels using attributes found in the SAMLResponse provided by the Identity provider. To use this feature, be sure that the IdP is providing access data in 3 different SAML attributes:
- an attribute to specify the sites a user has
viewaccess to (What is the view permission?) - an attribute to specify the sites a user has
writeaccess to (What is the write permission?) - an attribute to specify the sites a user has
adminaccess to (What is the admin permission?) - and an attribute used to specify if a user is a
superuseror not (What is the Super User in Matomo?)
Note: You can choose whatever names you want for these attributes. You will then tell LoginSaml about these names in the SAML settings page.
Identity provider access data example:
<saml:Attribute Name="view" NameFormat="urn:oasis:names:tc:SAML:2.0:attrname-format:basic">
    <saml:AttributeValue xsi:type="xs:string">all</saml:AttributeValue>
</saml:Attribute>
<saml:Attribute Name="admin" NameFormat="urn:oasis:names:tc:SAML:2.0:attrname-format:basic">
    <saml:AttributeValue xsi:type="xs:string">1,2,3</saml:AttributeValue>
</saml:Attribute>
<saml:Attribute Name="superuser" NameFormat="urn:oasis:names:tc:SAML:2.0:attrname-format:basic">
    <saml:AttributeValue xsi:type="xs:string">1</saml:AttributeValue>
</saml:Attribute>
Then in the SAML settings page, check the Enable User Access Synchronization from SAML checkbox and fill out the settings that appear below it.
User access synchronization occurs before the user logs in.
Managing Access for Multiple Matomo Instances
LoginSaml supports using a single IdP SAML server to manage access for multiple Matomo instances. If you’d like to use this feature, you must specify special values for SAML access attributes. For example:
view: myMatomoserver.whatever.com:1,2,3;myotherserver.com:alladmin: myMatomoserver.whatever.com:all;mythirdserver.com:3,4superuser: myotherserver.com;myotherserver.com/otherMatomo
If you don’t want to use URLs in your access attributes, you can use the Special Name For This Matomo Instance setting to specify a special name for each of your Matomo instances. For example, if you set it to MatomoServerA in one Matomo and MatomoServerB in another, your SAML attributes might look like:
view: MatomoServerA:1,2,3;MatomoServerB:alladmin: MatomoServerA:4,5,6superuser: MatomoServerC
Using a custom access attribute format
You can customize the separators used in access attributes by setting the User Access Attribute Server Specification Delimiter and User Access Attribute Server & Site List Separator settings.
If you set the User Access Attribute Server Specification Delimiter option to #, access attributes can be specified as:
view: MatomoServerA:1,2,3#MatomoServerB:all
If you set the User Access Attribute Server & Site List Separator option to #, access attributes can be specified as:
view: MatomoServerA#1,2,3;MatomoServerB#all
Advanced Settings
In the Advanced Settings section you can enable/disable the debug mode and also configure advanced SAML and security parameters.
Those settings match php-saml settings (the underlying PHP library in use in the SAML plugin and provided by OneLogin inc.), so you can review its documentation for more information.

Enable the option Use SAML FriendlyName Attributes to map Matomo user attributes with the attributes of the AttributeStatement’s SAMLResponse using the FriendlyName values instead of the Name. Note: This option requires IdP support and some popular IdPs including Azure do not support FriendlyNames, which causes SAML login issues.
How does SAML plugin for Matomo work?
This plugin adds the ability to execute SAML Single Sign On (SSO) and Single Logout (SLO) on the Service Provider side, but also on the Identity Provider. This section describes the SAML authentication flows.
SP-initiated SSO authentication process

- Redirect to Identity Provider (when “SAML Login” button on login screen is clicked):
- Log message: Initiated the Single Sign On, Redirecting to the IdP (Log level: info)
- When response from Identity Provider has come to Assertion Consumer Service endpoint:
- Log message: Initiated the Assertion Consumer Service (Log level: info)
- SAML validation successful:
- Log message: SAMLResponse validated (Log level: info)
- Log message: Attributes + NameId + NameIDFormat + SessionIndex (Log level: debug)
- Or SAML validation returned some errors in response from Identity Provider:
- Log message: SAMLResponse rejected. + Cause (Log level: error)
- Log message: SAML Response XML (Log level: debug)
- User creation (Optional step, if account was not found):
- If user does not exist but Just-In-Time provisioning is enabled and required attributes are provided: Log message: Added user (Log level: info)
- If user has no default sites access: Log message: SAML settings does not define default sites to provide access to new users in ‘Options’ section (Log level: warning)
- If user has default sites access: Log message: Adding to user USER access to sites: SITES (Log level: info)
- If user does not exists and Just-In-Time provisioning is enabled but process has failed: Log message: Just-in-time provisioning error // X mapping is required // X was not provided ( Log level: error)
- If user does not exists and Just-In-Time provisioning disabled: Log message: User
does not exists and just-in-time provisioning is disabled (Log level: error)
- Sync access (Optional step, if sync access enabled):
- If user has no data access: Log message: User
has no access in SAML, but access synchronization is enabled. (Log level: warning) - If access data defines that user should be assigned as superuser: Log message: MatomoAccess synchronised. User
is now superuser ( Log level: info) - If access data defines user access on sites: *Log message**: MatomoAccess synched. Access of user
updated (Log level: info)
- If user has no data access: Log message: User
- Successful login:
- Log message: User with login
authenticated in Matomo (Log level: info)
- Log message: User with login
IdP-initiated SSO authentication process

Similar to SP-initiated SSO but without step 1.
SP-initiated Single Logout authentication process (SLO enabled)

- Redirect to Identity Provider. (Logout Request sent). When “logout” link clicked and user session initiated with SAML flow:
- Log message: Initiated the Single Log Out for user with login USER (Log level: info)
- When Logout Response from Identity Provider has come to Single Logout Service endpoint:
- Log message: Initiated the Single Logout Service for user with login USER (Log level: info )
- SAML validation:
- If SAML Logout Response is valid: Log message: Single Logout Service executed. User with login USER logged out ( Log level: info )
- If there are some errors in Logout Response from Identity Provider: Log message: Error at Single Logout Service endpoint. User with login USER. + Error reason ( Log level: error)
IdP-initiated Single Logout authentication process (SLO enabled)

- When Logout Request from Identity Provider has come to Single Logout Service endpoint:
- Log message: Initiated the Single Logout Service for user with login USER (Log level: info)
- SAML validation:
- If there are some errors in Logout Request from Identity Provider: Log message: Error at Single Logout Service endpoint. User with login USER. + Error reason (Log level: error)
- Redirect to Identity Provider (Logout Response sent)
- When Logout Response from Identity Provider has come to Single Logout Service endpoint:
- Log message: Initiated the Single Logout Service for user with login USER ( Log level: info )
- SAML validation is successful:
- Log message: Single Logout Service executed. User with login USER logged out (Log level: info )
- Or SAML validated failed: errors returned in Logout Response from Identity Provider:
- Log message: Error at Single Logout Service endpoint. User with login USER. + Error reason (Log level: error)
To learn more about how SAML flows works, visit:
- medium.com/@BoweiHan/elijd-single-sign-on-saml-and-single-logout-624efd5a224
- www.samltool.com/saml_documentation.php
Security Considerations
User passwords
LoginSAML generates random hashed passwords for users when using just-in-time provisioning. If those users want to use the normal login process, a Super User should assign a valid password for them once authenticated via SAML, this password can be changed by the user only after being set by a Super User.
A Matomo password needs to be set in order to use certain functions such as generating a Token Auth or changing a setting that prompts password verification.
Password Confirmation
When changing a setting of a plugin or to activate/deactivate a Plugin, Matomo requires you to enter your password to proceed with the changes.
This could cause an issue if you are logged in using SAML, since Matomo would generate a random hashed passwords for users when using just-in-time provisioning. To ensure such users are able to change the setting or perform any action which requires password confirmation, SAML plugin with the release of version 4.3.0 provides a way to disable the password confirmation.
To disable password confirmation you can update the settings under SAML UI option setting.
Note: Password confirmation is disabled by default since the release of plugin version 4.3.0.
Token Auths
SAML has no concept of authentication tokens, so a user’s token_auth is stored exclusively in Matomo database. If a token_auth is compromised, you can re-generate the token in Matomo > Administration > Personal Settings.
Learn more on the LoginSaml for Matomo Analytics – SAML authentication plugin page.
Troubleshooting
Debugging
LoginSAML uses debug logging extensively so problems can be diagnosed quickly. Some logs entries contain sensitive information, so be sure to disable DEBUG logging in production and also switch off the Debug Mode in the Advanced Settings section of the SAML settings panel.
By default logs related with SAML will be found in Matomo folder tmp/logs/saml.log but can be changed defining a new value for the logger_file_path setting in the [LoginSaml] section of config/config.ini.php
The log level can be configured with the ‘log_level’ parameter and possible values are:
ERRORWARNINFODEBUG
The higher level, the smaller number of entries in logs. The highest level is ERROR level (the lowest is DEBUG).
If no log_level parameter defined in [LoginSaml] section then the default Matomo log_level value will be used (WARN).
Using Just-in-time provisioning and getting message “Username was not provided by the IdP and is required in order to execute the SAML Just-in-time provisioning”
The problem is that Service Provider (Matomo) is not able to extract a username value from the SAMLResponse sent by the IdP. There are 2 possible reasons:
- The Attribute Mapping section at the SAML Settings of Matomo is wrong. There you might need to set the username field to the exact name of the attribute that came with the SAMLResponse.
- The IdP is not sending the username at all, so you may need to contact the Identity Provider administrator and ask him to configure the IdP to provide that user info.
Note that even if you are identifying users by the email address, the username is a required field when you are using Just-in-time provisioning: so both email and username must be provided. You can find out more about your SAML response by using SAML Tracer tool (see below).
How to view the SAML and WS-Federation messages sent through the browser during single sign-on and single logout
There is a Firefox extension named SAMLTracer that you can use to record and inspect the SAMLResponse sent by the IdP. There is a tutorial video at https://www.youtube.com/watch?v=DLEif7nuNxg. Always be cautious when adding any browser extension: stored memory of the browser may become accessible to the person who developed the extension.