How to track events inside an iframe using Matomo Tag Manager
If your website includes an <iframe>, you can track user interactions inside it by sending event data from the iframe to the parent page. Common use cases include tracking engagement with embedded forms, clicks inside interactive widgets, and interactions with a cookie banner displayed within the iframe.
This guide explains how to pass iframe event data to Matomo Tag Manager (MTM).
Before you start
- Ensure you have access to edit both the iframe source and the parent page.
- The iframe and parent should ideally share the same top-level domain. If they are on different domains, use
postMessagesecurely. - Matomo Tag Manager should be set up and actively tracking page views on the parent site.
Configure the iframe
To send interaction data from the iframe to the parent website, you must first define a function in your iframe’s source code. This function is then called whenever a user interacts with a tracked element.
Add the event sender code to the iframe
Add the following script to your iframe source (e.g. iframe-content.html) to send structured event data to the parent window using postMessage.
When the iframe and parent are on the same origin, use this code:
<script>
  // Send a message from the iframe to the parent page using a strict origin
  function sendEventFromIframe(data) {
    window.parent.postMessage({ dataLayer: data }, window.location.origin);
  }
</script>
When the iframe and parent are on different domains use this code:
<script>
  // Send a message from the iframe to the parent page using a wildcard
  // Only use '*' during testing; replace with specific origin for production
  function sendEventFromIframe(data) {
    window.parent.postMessage({ dataLayer: data }, '*');
  }
</script>
Replace * with the exact parent origin for added security, for example:
window.parent.postMessage({ dataLayer: data }, 'https://example.com');`
Define the event in the iframe
Once the sendEventFromIframe() function is available in your iframe’s source code, you can call it whenever a user interacts with a tracked element such as a button click.
The function sends a custom event object to the parent page. This object should follow the structure expected by Matomo Tag Manager by including an event name and optionally category, action, label, or value that can be used to populate variables in your MTM tag.
Example of a defined event for a button click action inside an iframe:
<button onclick="sendEventFromIframe({
  event: 'iframeClick',
  category: 'iframe',
  action: 'click',
  label: 'Click me'
})">
  Click me
</button>
In this example:
- The event name is
iframeClick, which will be used to fire a custom event trigger in MTM. - The category, action, and label can be made available to your Matomo Event Tag via data layer variables (optional).
This structure ensures MTM can capture and process event data from the iframe.
Configure Matomo Tag Manager
The page where the iframe is embedded (e.g. campaigns.html) needs to receive messages from the iframe and forward them to Matomo Tag Manager’s _mtm data layer. You can do this using one of the following methods:
- Add the following script directly to the parent page’s HTML, or
- Add the script in a Custom HTML tag in the MTM container.
You can modify this code to suit your specific environment. The key requirement is that valid event data from the iframe is pushed to _mtm.
<script>
    window.addEventListener('message', function(event) {
      // Optional: validate origin (recommended for production)
      if (event.origin !== window.location.origin) {
        console.warn('Untrusted origin:', event.origin);
        return;
      }

       // Check that the message contains expected dataLayer format
      if (!event.data.dataLayer) {
        return;
      }

      // Push to Matomo's data layer (_mtm)
      window._mtm = window._mtm || [];
      window._mtm.push(event.data.dataLayer);
      console.log('Event sent to MTM:', event.data.dataLayer);
    });
  </script>
Listen for iframe events in the parent page
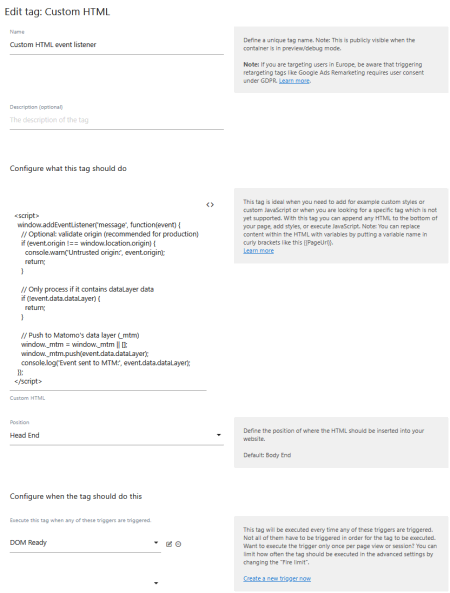
- To use the Custom HTML tag, open the container in Matomo Tag Manager.
- Navigate to Tags > Click Create New Tag and choose Custom HTML.
- In the Custom HTML field, paste the event listener code (example above).
- Set the Position to Head End. This will inject the script into your website’s code before the closing
</head>tag. - Click the Create New Trigger link to add a DOM Ready or Window Loaded trigger with a condition where the Page URL contains (or equals) the parent page URL, e.g.,
Page URL contains campaigns.html.
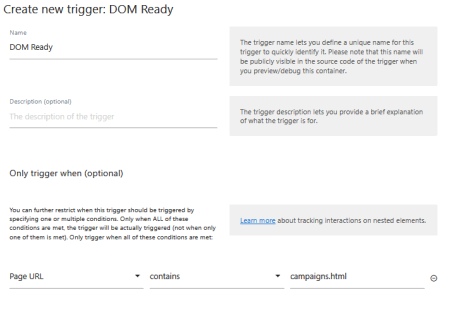
- Click Create New Trigger to save and return to the Custom HTML tag configuration page.
- Click Create New Tag to save the new Custom HTML tag.
Set up iframe event tracking
Now that the iframe sends events and the parent receives them, you need to configure MTM to track events in the iframe. The following steps refer to button click iframe example.
Create a Custom Event trigger
- In Tag Manager, navigate to Triggers and click Create New Trigger.
- Choose the Custom Event trigger and provide a custom name (optional).
- For the Event Name, enter
iframeClick. - Click Create New Trigger to save.
Create Data Layer variables (optional)
If you’re only tracking one type of event inside the iframe (e.g. a single button click), you can enter the iframeClick event values directly in the tag configuration without needing to create variables.
When tracking different events inside the same iframe, you can dynamically assign values such as the event category, action, or label, by using Data Layer variables in MTM. This captures different events with varying metadata, e.g., tracking clicks on multiple buttons.
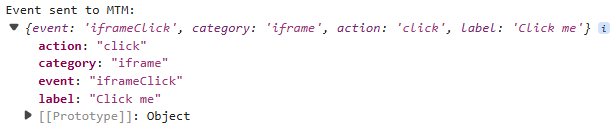
- To set up variables to capture multiple click events, you will need to create one variable for every event attribute. You can see the event object in the
_mtmdata layer by opening the web page containing the iframe and performing the event action then open the browser’s Developer Tools > Console tab to view the event pushed to_mtm.
- In Tag Manager, navigate to Variables and click Create New Variable.
- Choose the Data Layer variable and provide a custom name (optional), e.g., Event Action.
- For the Data Layer Variable Name, enter
action(for the Event Action variable). - Click Create New Variable to save.
- Repeat these steps for each variable matching the event structure, e.g., category and label.
Add the Matomo tracking tag
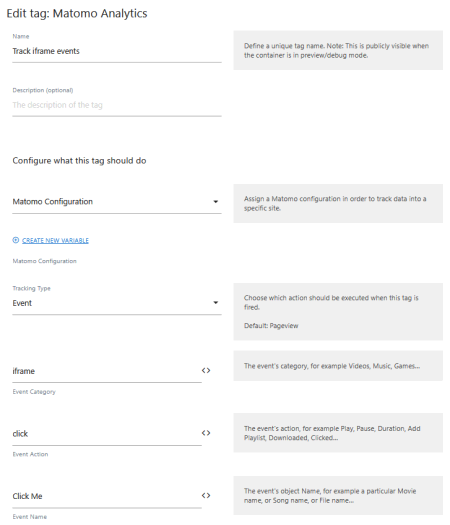
- Navigate to Tags and click Create New Tag.
- Choose the Matomo Analytics tag and provide a custom name to differentiate it from other Matomo tracking tags.
- For Tracking Type, choose Event.
- To define the event details that must be captured, you can either select the newly-created Data Layer variables for tracking different events inside the iframe, or enter static values if you’re only tracking a single event, for example:
- Link the Custom Event trigger created previously (e.g., iframeClick).
- Click Create New Tag to save.
Validate the configuration
After setting everything up, it’s important to test and confirm that the event data flows correctly from the iframe to Matomo Tag Manager and into your Matomo reports.
- Enable Preview mode in Matomo Tag Manager.
- Reload the parent page in your browser and check the DOM Ready trigger fires.
- Trigger the event in the iframe and verify the Custom Event trigger and Matomo event tracking tag fire.
- If you created the Data Layer variables, view the Variables tab to ensure the event details were captured. Or click on the Data Layer tab to view the event data.
- Open Visitors > Visits Log or Real-time report to verify tracking requests are sent.
- Navigate to Behaviour > Events to view the iframe interactions by Event Categories, Event Actions, and Event Names.
Limitations
- This configuration does not work with third-party iframes that you cannot modify.
- Cross-origin
postMessageworks only if thetargetOriginandevent.originare correctly configured. - Consent logic is not shared between iframe and parent, so ensure that any tracking complies with your consent mechanism.
Cross-domain tracking considerations
If your iframe and parent page are hosted on different domains, you will need to take additional steps to ensure secure communication, compliance with privacy regulations, and proper consent handling. The following considerations apply when using postMessage across origins with Matomo Tag Manager.
Security
Avoid using the wildcard * as the targetOrigin in postMessage, as this allows the message to be received by any domain and may expose your site to security risks. Instead, specify the exact origin of the parent page:
window.parent.postMessage({ dataLayer: data }, 'https://www.example.com');
On the parent page, validate the origin of incoming messages before pushing data to Matomo:
if (event.origin !== 'https://iframe-source.example.com') {
  return;
}
Consent management
Cross-origin communication does not imply shared consent. If your site or iframe sets cookies, tracks data, or logs interactions, ensure that consent is collected from the user, and you have a legal basis (e.g. consent or legitimate interest) for tracking. Read more on the ePrivacy Directive and GDPR and Matomo Analytics.
Matomo Tag Manager handles consent per container. If the iframe is hosted externally:
- its container will not automatically inherit consent from the parent.
- the parent and iframe must explicitly exchange consent state via postMessage or a CMP (Consent Management Platform).
To implement a CMP with Matomo Tag Manager, refer to the CMP integration guides.