How to use Custom Dimensions with the User ID for Ecommerce reports
With Matomo User ID tracking enabled, you can send additional context about the customers completing an Ecommerce order. By using Custom Dimensions, you can segment Ecommerce orders by customer attributes and compare performance across groups by any attribute you store with the logged in User ID. For example, you could track:
- Client type: SME, Enterprise, reseller
- Client name: Company name
- Client status: New, Returning
- Client age (duration): <1year, 2-3years, 4+ years
- Subscription level: Free, Basic, Premium
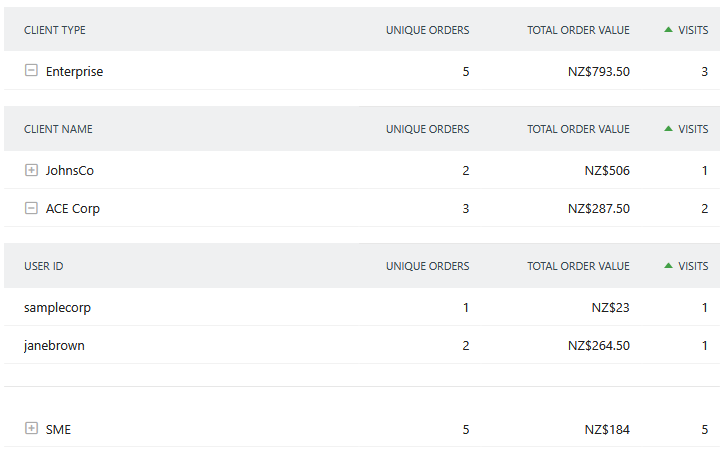
Ecommerce orders are logged as conversions within a visit, so Visit-scope Custom Dimensions can be used to apply attributes, associated with the User ID, to the Ecommerce order. Once this data is tracked, the User ID is effectively enriched with additional context. You can then create a Custom Report with the dimension (e.g. client type) to compare revenue between SMEs and enterprise clients.
This guide explains how to use Custom Dimensions to track user attributes for Ecommerce orders. Before you start, make sure Ecommerce tracking is already set up in your Matomo instance.
Add a Visit-scope Custom Dimension
First, you will create a Visit-scope dimension to capture user attributes, such as clientName and clientType. `These values should be dynamically populated directly from your site’s logged-in user information.
- In Matomo, navigate to Administration
 > Websites > Custom Dimensions.
 - Create new Visit-scope dimensions for each attribute you want to track.
- Select Active to enable the dimension.

- Click Create and note the ID assigned to each dimension.
Modify the Matomo tracking code
In the next step, you will need to update your Matomo tracking code to set the dimensions right before trackEcommerceOrder. This ensures the attribute is tied to the User ID and order and not applied to visits where the user does not convert.
// SAMPLE CODE - DO NOT COPY DIRECTLY
// Dynamically populate these values from your website or backend

// Set User ID (use a pseudonymous identifier, e.g. hashed email)
_paq.push(['setUserId', userId]);

// Set Visit-scope Custom Dimensions for user attributes
_paq.push(['setCustomDimension', 1, clientName]);
_paq.push(['setCustomDimension', 2, clientType]);

// Track the ecommerce order
_paq.push(['trackEcommerceOrder',
  orderId,
  grandTotal,
  subTotal,
  tax,
  shipping,
  discount
]);
Create a Custom Report
- Navigate to Matomo > Custom Reports to build a report that includes the User ID, new dimensions and Ecommerce metrics.
- Select the dimensions you created (e.g. Client Type, Client Name).
- Choose relevant Ecommerce metrics such as Orders, Revenue, or Average Order Value.
- Use Preview Report to check the report structure is correct.
- Click Create New Report to save.
Once your Custom Dimensions are tracking correctly, not only can you compare Ecommerce performance across different user groups, you can also create a segment based on the dimension such as Client Type. This lets you filter Ecommerce reports and view metrics only for a specific group, such as SMEs or Enterprise clients.