How to display Coupon or Discount Codes in Matomo
With Matomo Ecommerce, you can track discount amounts as numerical values when tracking an order. This is done by passing the discount value as a parameter in the trackEcommerceOrder function.
However, the name or code of the discount (e.g. FREESHIP, PROMO10) is not tracked by default and does not appear in standard reports. To analyse which discount codes were used and how often, you can use a Custom Dimension and a Custom Report.
Matomo supports both Visit and Action Custom Dimensions. A Visit-scope dimension applies to all hits during a visitor’s session, while Action-scope dimensions apply only to individual actions like a page view or an event. When using trackEcommerceOrder to track orders, Matomo logs the purchase as a conversion and not an action. So, it’s important to understand how each type of Custom Dimension interacts with the tracking method.
This guide explains which Custom Dimension scope to use and how to configure tracking to display coupon codes.
Use a Visit-scope Custom Dimension
You can use a Visit-scope Custom Dimension to associate a coupon code with an Ecommerce order because conversions are considered part of the visit session. To ensure the coupon code is linked only to completed purchases, the dimension must be manually set immediately before calling trackEcommerceOrder. If you set the Custom Dimension before trackPageview, and not before trackEcommerceOrder, the dimension is applied to all visits even if the visitor did not complete a purchase.
Caveat: Since Visit-scope dimensions store one value per visit, only the last coupon code captured during that visit will be recorded. If a visitor returns multiple times with different codes, only the value from their most recent visit will be saved.
- Navigate to Administration
 > Websites > Custom Dimensions.
 - Create a new Visit Custom Dimension with an identifiable name, e.g., Coupon Code. This dimension will store the discount code name (e.g. ‘PROMO10’, ‘FREESHIP’) at the time of purchase.
- Select the Active checkbox to enable the dimension.
- Click Create to save.
- Take note of the Id in the
Idcolumn of the new Custom Dimension. - The new Visit-scope dimension (e.g., Coupon Code) must be set at the time of purchase to avoid attaching a coupon code to all visits where no purchase occurred.
- Update your Matomo tracking code to include
_paq.push(['setCustomDimension', customDimensionId, 'dimensionValue']);beforetrackEcommerceOrder.
You can manually define the coupon code as shown in the example code below, or set it dynamically.
// SAMPLE CODE
//Set the Visit-scope Custom Dimension
_paq.push(['setCustomDimension', 10, 'PROMO10']);

// Then track the ecommerce order
_paq.push(['trackEcommerceOrder',
  orderId,     // Unique Order ID
  grandTotal,  // Total revenue
  subTotal,    // Subtotal (optional)
  tax,         // Tax amount (optional)
  shipping,    // Shipping cost (optional)
  discount     // Discount amount (optional)
]);
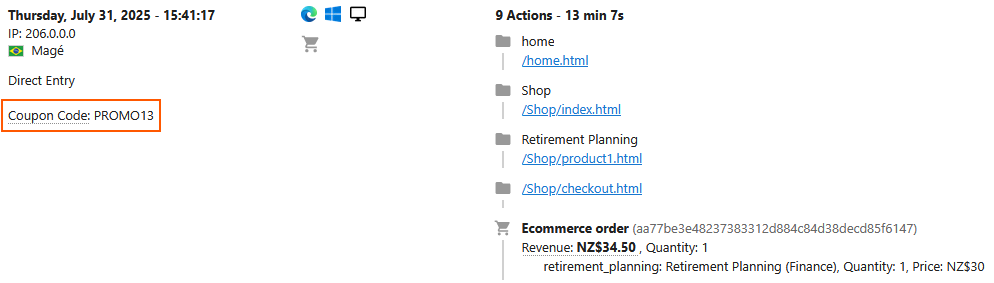
This method ensures the coupon data is associated only with the order and does not persist across other page views. An example of the coupon code displayed at the Visit level for completed purchases.
Use an Action-scope Custom Dimension
Instead of using a Visit dimension, you can use an Action-scope Custom Dimension to capture coupon codes automatically when the value appears in the Page URL, Page Title, or URL query parameter on the order confirmation page. For example, where the coupon code is included in the confirmation page URL, /checkout/success?coupon=PROMO10 or the coupon is embedded in the page title, Thank you – Code: PROMO10.
This does not require manually setting the dimension in your tracking code.
- Navigate to Administration > Websites > Custom Dimensions.
- Create a new Action Custom Dimension with an identifiable name, e.g., Coupon Code. This dimension will capture the coupon code name (e.g. ‘PROMO10’, ‘FREESHIP’) at the time of purchase.
- Select the Active checkbox to enable the dimension.
- For the Extract Value options, choose one of the following based on where the coupon code appears on your confirmation page:
- Page URL: Extracts the value from the full URL string. Use this if the coupon code is embedded directly in the page URL, e.g.
/success?coupon=PROMO10. - Page Title: Extracts the value from the page’s
<title>element. Use this if the coupon code appears in the browser tab or title bar, e.g.Thank You – Coupon: PROMO10. - Page URL Parameter: Extracts the value from a specific query parameter (e.g.
?coupon=PROMO10). Enter the exact name of the parameter, such ascoupon.
- Page URL: Extracts the value from the full URL string. Use this if the coupon code is embedded directly in the page URL, e.g.
- The value or parameter name must match exactly how it appears in your website’s URL or title, including case sensitivity, otherwise, Matomo cannot extract the dimension value.
- Click Create to save.
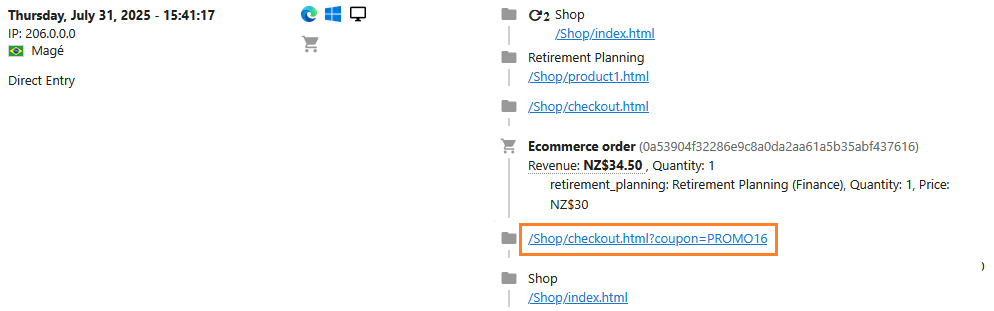
Example of the coupon code displayed at the Action level for completed purchases:
Create a Custom Report
In the next step, you can build a new Custom Report to include the Coupon Code dimension.
1. Navigate to Matomo > Custom Reports > Manage Reports and click Create New Report.
2. Select the newly-created custom dimension e.g., Coupon Code and the Ecommerce > Discount dimension.
3. At a minimum, include the Hits metric.
4. Click Create New Report to save.
For example, the Custom Report dimension labelled as Coupon Code will capture the codes used for completed orders:
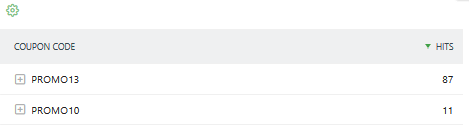
This will allow you to see which coupon codes were used and how many times each code was applied. Over time, you will be able to identify the most popular codes and compare usage across time, sources, or user segments.