Setting up a Google Analytics Import for high traffic websites
Matomo can import historical data from Google Analytics using the Google Analytics Importer plugin. This feature is available by default in Matomo Cloud. For Matomo On-Premise, install and activate the Google Analytics Importer from the Marketplace.
You will need to authorise Matomo to access Google’s API using OAuth credentials. This guide explains how to configure that access using the Google Analytics Reporting API. It is intended for Matomo On-Premise users and Matomo Cloud users with high-traffic websites who require a manual setup..
If you use Matomo Cloud and manage a small or medium-traffic website, use the Quick Connect with Google Analytics feature. It requires minimal setup and lets you start importing data quickly.
Create the Google OAuth Client Config
![]()
You do not need to submit your application to Google for verification at any point in this process. If Google prompts you to submit the app and you cannot cancel or decline the request, it usually indicates a missed step or added information that triggered Google’s verification workflow. Review this guide carefully.
This process involves creating an application that allows Matomo to request authorised access to your Google Analytics data securely. It requires creating a project in Google Cloud Console, and configuring the OAuth consent screen and client credentials.
1. Create a project in Google Cloud Console
- Sign in to the Google Cloud Console and open the project selector.

- Click the New Project option.
- Provide a project name (for example, Matomo GA Import) and click Create.
- A notification will appear. Click Select Project to open the new project.

2. Enable the Google Analytics API
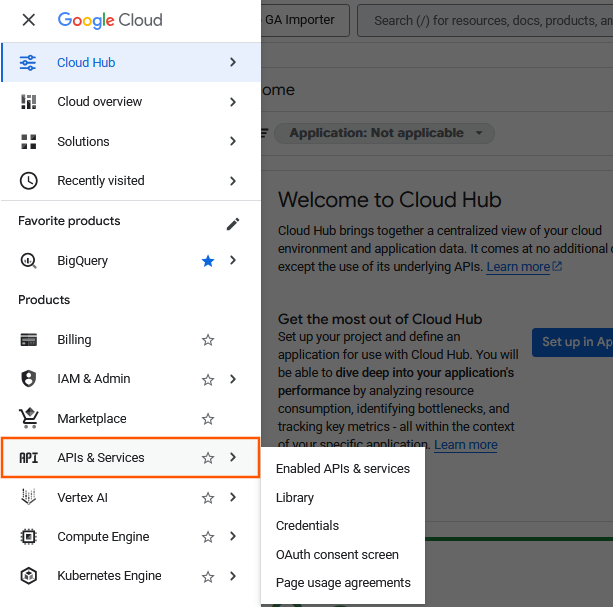
- Open the main Google Cloud menu and go to Products – APIs & Services.

- Click Library and search for ‘Google Analytics Data API’.
- Select the API and on the product details page, click Enable.
- Do the same for the Google Analytics Admin API only if you want to migrate Google Analytics 4 data.
3. Setup the OAuth consent screen
- Open the Google Cloud menu and go to Products – APIs & Services > OAuth consent screen.
- Click Get started to go through the project configuration wizard.
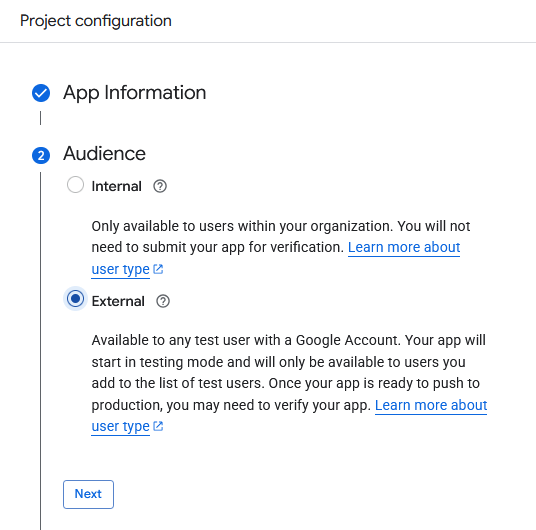
- Enter the App Information (name and email) and click Next.
- Select the Audience: Internal or External. If you create an External app, it will start in testing mode; if you create an Internal app, you do not need to submit the app for verification.

- Internal apps do not have a 7 day expiry time and you only have to authorise Matomo once. Note that internal apps are only available to users that have purchased Google Workspace to run imports from Google Analytics.
- External apps can be created by anyone. For most cases, we recommend creating a published, external app to ensure import works seamlessly. If you do not publish it, Google limits authorisation to seven days. After that, the authorisation expires and you must manually re-authorise Matomo every seven days until the import finishes.
- Complete the required details and click Create.
- The OAuth Overview page opens where you will set up a new client.
4. Create the OAuth client
- After creating the app, click Create OAuth client from the OAuth Overview page.
- Select Web Application as the Application Type.
- Set a name for the application.
- Scroll down to Authorized JavaScript origins and click on Add URI.
- Provide your Matomo URL domain. This needs to be a domain. If Matomo is installed in a subdirectory, enter the domain without the path, for example
https://matomo.my-website.example/. - Scroll down to Authorized redirect URIs and click on Add URI.
- Enter your Matomo URL and add the following at the end of the URL
/index.php?module=GoogleAnalyticsImporter&action=processAuthCode
Because the URLs are HTTPS, we highly recommend running your Matomo instance over SSL. - If you are using Matomo for WordPress, the URL must begin with the entire path to Matomo’s admin page, for example
https://mysite.com/wp-content/plugins/matomo/app/index.php?module=GoogleAnalyticsImporter&action=processAuthCode - Once you have entered the two URIs, click Create to finish.
- A pop-up will show the newly-created credentials. Click on DOWNLOAD JSON to save the file as you will need to upload this to Matomo later.

If you change any settings above, for example to fix a typo in one of the values, download the OAuth credentials again and re-upload it in Matomo.
5. Configure the OAuth app
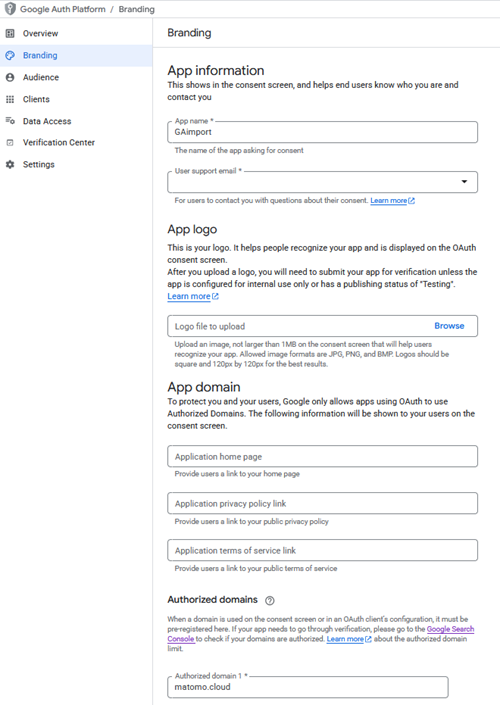
- Open the Google Cloud menu and go to Products – APIs & Services > OAuth consent screen.
- In the left menu, go to Branding to view and update the app information.
- Important: Do not upload an App logo here, doing so will require you to submit your app to Google for verification which can take several months to complete.
- The Authorized domains must display your Matomo domain, for example, matomo.cloud.

- Click Save.
- In the left menu, go to Audience to manage the app’s publishing status.
- When your app is ready to be published, click Publish app.
- You can add Gmail users to give them access to test the app while its in Testing status.
- In the left menu, go to Data Access to manage restricted scopes.
- Save your changes.
- If you receive a warning,
Google hasn’t verified this app, you can safely continue by clicking on Advanced and then Go to matomo.cloud (unsafe) or Go to yourdomain.com (unsafe). - Your OAuth Client Configuration is now complete.
Authorise Matomo to access GA data
Once you have downloaded your OAuth client credentials, you need to authorise Matomo to access your Google Analytics data.
- Log into Matomo as a superuser and go to Administration > System.
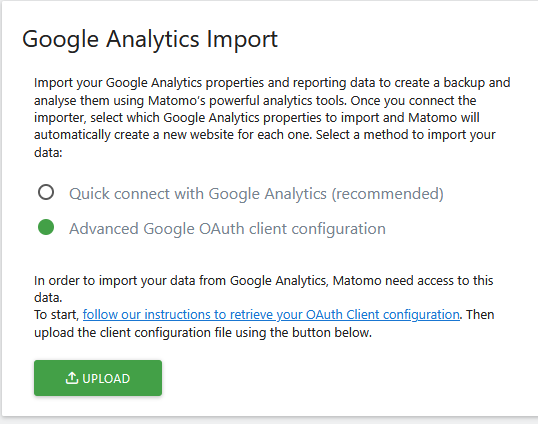
- Click Google Analytics Import. If you do not see this option, check the GoogleAnalyticsImporter plugin is installed and active.
- Select the option, Advanced Google OAuth client configuration.

- Upload the OAuth client credentials you downloaded when creating the OAuth client earlier.
- Click Authorize and follow the prompts to give Matomo access to your Google Analytics data.
- Click Continue to authorise your app if prompted by Google.
- When Matomo is authorised, configure the schedule for your import in System > Google Analytics Import.
Matomo will validate the connection and begin importing data from your selected Google Analytics property. Depending on the date range and traffic volume, the initial import may take several hours.