How to capture checkbox values from a submitted Form using Matomo Tag Manager
When enabled, the Matomo Form Analytics premium feature automatically tracks which form fields visitors interact with, providing a high-level view of form engagement. Form Analytics can show whether a checkbox field was filled or left blank, but it does not record the actual value selected.
Custom tracking is only required if you want to capture the value of each checked box, understand which combinations of options users choose and track these values via a custom dimension or event.
This guide explains how to configure Matomo Tag Manager to capture values from selected checkboxes and then send them to Matomo on form submission.
Before you start
Ensure Matomo Tag Manager is installed on your site and already tracking page views and form interactions. This confirms your container is active and ready to handle additional custom tracking.
Create an Action Custom Dimension
The Action-scope Custom Dimension stores the checkbox values with the associated form submission action.
- Navigate to Administration
 > Websites > Custom Dimensions.
 - Create a new Action Custom Dimension with an identifiable name, e.g., Form Preferences.
- Select the Active checkbox to enable the dimension.
- Click Create to save.
Configure Matomo Tag Manager
When setting up checkbox value tracking in Matomo Tag Manager, you can either use data layer variables or read values directly from the DOM with a Custom JavaScript Variable. The number of container components you need depends on the approach you choose.
This guide demonstrates the Custom JavaScript Variable method, which follows this workflow:
- A visitor fills out a tracked form, selects one or more checkboxes, and submits the form.
- The Form Submit trigger fires a Matomo event tracking tag.
- The tag calls a Custom JavaScript Variable that retrieves the selected checkbox values from the DOM.
- The tag sends this data to Matomo, either as an event, a custom dimension, or both.
- A Custom Report is used to analyse patterns and preferences selected by website visitors.
The example form used:

Step 1: Create a Custom JavaScript Variable
By using a single Custom JavaScript Variable to read the checkbox values directly, you can pass those values into your tag at trigger time. This records the latest selections on form submission without you have to add custom code to the web page.
- Navigate to Tag Manager > Variables and click Create New Variable.
- Choose the Custom JavaScript type.
- Add the JavaScript function and click Create New Variable to save.
function (){
  var checkboxes = document.querySelectorAll('.form-checkbox');
  var values = [];
  for (var i = 0; i < checkboxes.length; i++) {
    if (checkboxes[i].checked) {
      values.push(checkboxes[i].value);
    }
  }
  return values.length > 0 ? values : null;
}
Step 2: Add a Form Submit Trigger
In this step, you will add a form submission trigger for sending the final selection values.
- Navigate to Tag Manager > Triggers and click Create New Trigger.
- Choose the Form Submit type.
- Define a condition to fire the trigger when a specific form is submitted. You can use the
Form IDorForm Namee.g., For example,Form IDequalscontactForm. Alternatively, you can useForm Classesif you want to fire the trigger for any form submitted. - Click Create New Trigger to save.
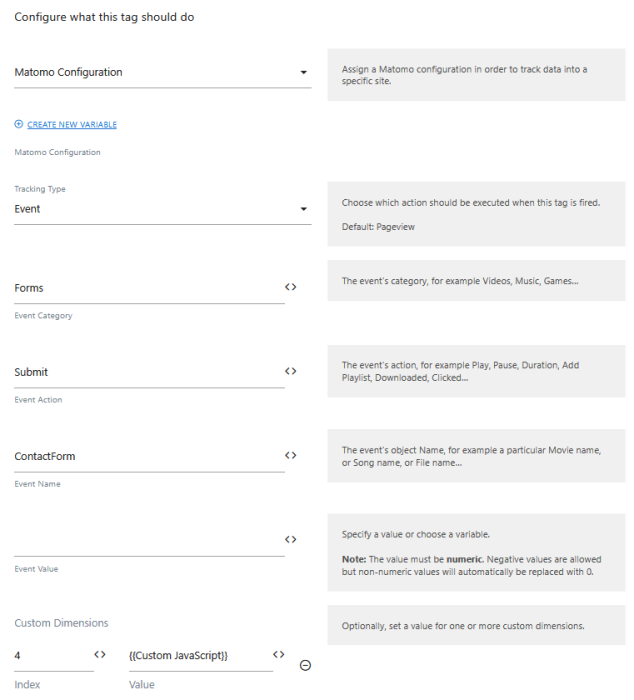
Step 3: Add a Matomo Event Tracking Tag
The Form Submit trigger will fire the Matomo Event tag and to send the values to Matomo. The Custom Dimension must be included to store the values for reporting.
- Navigate to Tag Manager > Tags and click Create New Tag.
- Choose the Matomo Analytics type.
- For the Tracking Type, select Event.
- Define the Event Category, Event Action, and Event Name that will be displayed in your reports.
- In the Custom Dimension field, enter the Index (dimension Id) and choose the Custom JavaScript Variable for the Value field.
- Click Create New Tag to save.
Step 4: Create a Custom Report
- Navigate to Matomo > Custom Reports to build a report that includes the new action dimension.
- Select Event Name for the first dimension and the new action scope dimension as the second report dimension.
- At a minimum, include the Hits metric.
- Click Preview Report to ensure the report structure is correct.
Validate the configuration
After setting everything up, it’s important to test and confirm that the event data flows correctly to your Matomo reports.
- Enable Preview / Debug mode in Matomo Tag Manager.
- Open the page containing the form page and complete the form with checkbox selections.
- When the form is sent, the Form Submit trigger and Matomo Analytics event tag will fire.
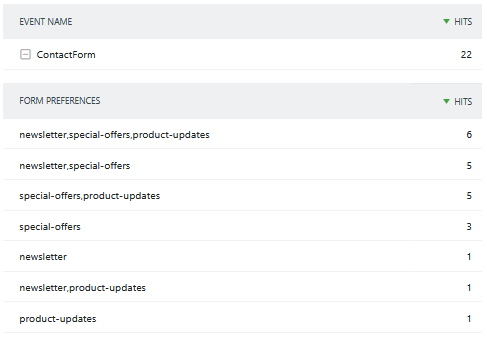
- Check the Variables tab in debug mode to verify the Custom JavaScript Variable captured the selected checkbox values. If you need all selected values, confirm the JavaScript Variable returns an array containing all selected values (e.g., newsletter,product-updates) instead of only the first value.
- Go to Matomo > Visitors > Real-time report to confirm the event and dimension values are recorded.

- Once events appear in standard reports, confirm the Custom Report shows the correct combinations.
By implementing this setup, you gain detailed insights into the specific options visitors select, enabling precise analysis of preferences and behaviour.