Create and manage Heatmaps
To start recording user mouse movements and generating page heatmaps, you will need to first create a Heatmap.
No developer knowledge is needed to configure any of the heatmaps and you don’t need to adjust the code on your website. When you manage your heatmaps, the UI always explains what each step is about in detail and it will literally take you only seconds to track your users interactions and generate heatmaps.
- In Matomo, go to Heatmaps > Manage Heatmaps.
- Click on Create New Heatmap.
- To edit a heatmap, simply click on the
 edit icon next to the name of a previously created heatmap.

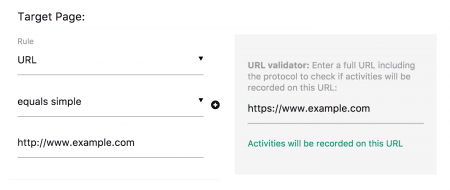
- When you create or edit a heatmap, all you need to do is define a name for the heatmap and choose on which target page the heatmap should be generated for. To do this, you can choose between “URL”, “URL path”, “URL parameter” attributes and comparisons like “equals”, “starts with”, “contains”, “matches the regular expression”, and many more.
- The validator next to your target page lets you easily test whether the page you want to match actually matches the Pages for which you want to generate Heatmaps.
From Matomo 5.4.0, you can use the ![]() copy icon to duplicate heatmaps for the same website or for other tracked websites. After copying, review and adjust the settings of the new heatmap to ensure they are correct.
copy icon to duplicate heatmaps for the same website or for other tracked websites. After copying, review and adjust the settings of the new heatmap to ensure they are correct.
Advanced options
When you configure a heatmap, you can optionally define advanced options such as:
- choose a Screenshot URL
- hide elements from the heatmap
- choose a different Sample rate
- define the Breakpoint width for Mobile phones and Tablet (useful if your website is responsive)
As always, the meaning of each option is clearly explained in the user interface.
Note that the Heatmap & Session Recording plugin settings are configured under Matomo settings (Administration) ![]() > System > General Settings > Heatmap & Session Recording.
> System > General Settings > Heatmap & Session Recording.