How to export data from Matomo Cloud to Snowflake
If you use Matomo Cloud, you can export your analytics data to external data warehouses using the Data Warehouse Connector. When configured, it automates the process of exporting selected Matomo tables to Amazon S3 before the data is imported to Snowflake.
This guide explains how to import Matomo Cloud data into Snowflake using Amazon S3 as the transfer layer. It involves setting up the Snowflake database, schema, and Matomo tables before creating stages that reference your Matomo S3 exports. Once set up, you can then load the data into Snowflake tables using the SQL COPY command.
If you are an On-Premise user, you will have direct access to your own databases, while Cloud customers need to activate the Data Warehouse Connector feature to automate exports of Matomo data. Learn how to enable data warehouse exports in Matomo Cloud.
Set up the Data Warehouse Connector
To start, you first need to prepare your exports in Matomo and follow the steps outlined below.
1. Enable the Data Warehouse Connector
Users on a monthly or annual Matomo Cloud plan can activate the feature in Matomo > Administration ![]() > Export > Data Warehouse Connector. This requires a paid subscription.
> Export > Data Warehouse Connector. This requires a paid subscription.
2. Configure the Data Warehouse Connector and enabled selected sites
Use the Data Warehouse Connector setup guide for detailed instructions on how to enable the export of your Matomo Analytics data and select which sites’ data to export. It is also optional to backfill historic data if you need older records.
You will also need to determine which tables to export but note that not every site uses every Matomo feature and table. For guidance on recommended and optional tables, refer to the list in the the setup guide.
3. Next steps
Once the above setup is complete, Matomo will process your data and make it available in Amazon S3 in JSONL format.
Continue with the instructions below to configure Snowflake to import data. Every table exported from Matomo will need a corresponding table and stage in Snowflake.
Set up Snowflake to import data
Users should have basic familiarity with Snowflake and general database concepts. If you are new to Snowflake, review its official documentation before continuing.
1. Create your Snowflake database and schema
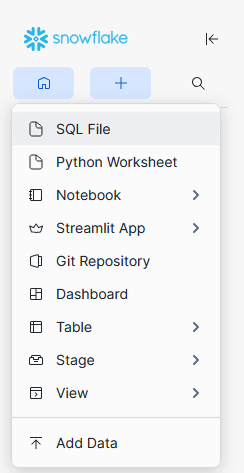
- In your Snowflake account, click the plus icon + and select SQL file.
- Use the SQL statement
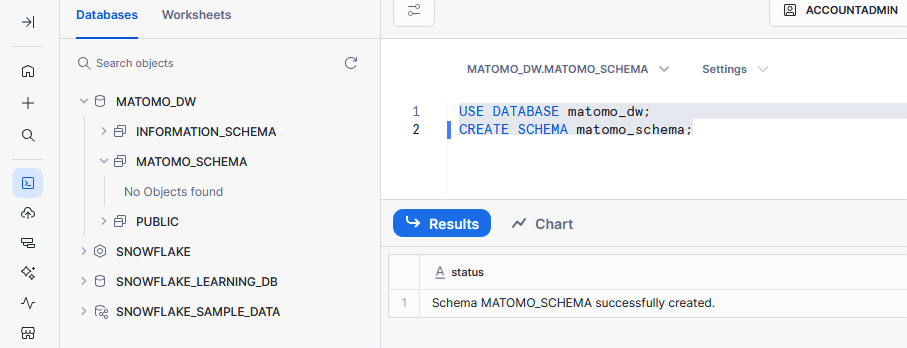
CREATE DATABASEand provide a new database name, for example, run the following script:CREATE DATABASE matomo_dw; - You will need to reference the new database where you want to create the schema and provide a schema name, for example:
USE DATABASE matomo_dw;

CREATE SCHEMA matomo_schema; - Your database and schema are now ready.
- Set them as your active context when running SQL queries to create tables and stages inside this schema.
2. Create required Tables matching the Matomo schema
For each exported Matomo table (e.g. log_action, log_visit, log_link_visit_action, site), you will need to create a table in Snowflake.
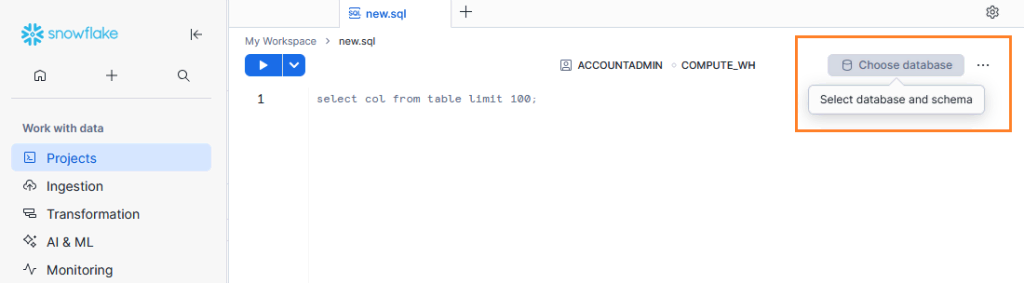
- Click the plus icon + and select SQL file and connect to the Matomo database and schema created previously.
- Use the SQL statement
CREATE TABLEto create the Matomo tables in Snowflake.
- Refer to the Matomo GitHub repository for the official Matomo table schemas. Open the
<table>.jsonfiles and use the schema provided to create your tables in Snowflake. The table structures in Snowflake must match the Matomo schemas to ensure data loads correctly. - When defining tables in Snowflake, ensure that each column uses a compatible SQL data type.
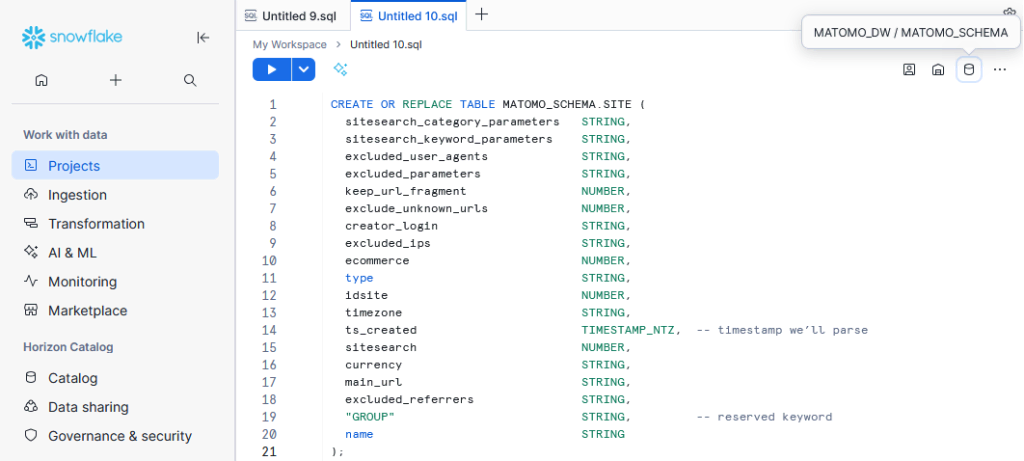
- Example script to create the SITE table:
CREATE OR REPLACE TABLE MATOMO_SCHEMA.SITE (
  sitesearch_category_parameters   STRING,
  sitesearch_keyword_parameters    STRING,
  excluded_user_agents             STRING,
  excluded_parameters              STRING,
  keep_url_fragment                NUMBER,
  exclude_unknown_urls             NUMBER,
  creator_login                    STRING,
  excluded_ips                     STRING,
  ecommerce                        NUMBER,
  type                             STRING,
  idsite                           NUMBER,
  timezone                         STRING,
  ts_created                       TIMESTAMP_NTZ,  -- timestamp we’ll parse
  sitesearch                       NUMBER,
  currency                         STRING,
  main_url                         STRING,
  excluded_referrers               STRING,
  "GROUP"                          STRING,         -- reserved keyword
  name                             STRING
);
Note: If a column name is a SQL keyword (e.g., "GROUP" in the SITE table), quote it in DDL and in the COPY command when loading data into the Snowflake tables.
3. Create Stages in Snowflake
After creating all your required tables, the next step is to create an external stage for every table. Each stage points to the table’s S3 prefix and must parse JSON.
- Connect to the right database and schema and click the plus icon + and select SQL file.
- Use the SQL statement
CREATE STAGEto create a new stage. - For example, running this script will create the Site stage (named after the Site table for easy reference).
CREATE OR REPLACE STAGE MATOMO_DW.MATOMO_SCHEMA.SITE
 URL = 's3://prod-processed-customer-exports/demo.matomo.cloud-xxxxx.../site/'
 CREDENTIALS = ( AWS_KEY_ID = 'ADDYOURKEY' AWS_SECRET_KEY = 'ADDYOURKEY' )
 REGION = '<eu-west-3>'
 FILE_FORMAT = (
 TYPE = JSON,
 MULTI_LINE = FALSE, -- JSONL (one object per line)
 STRIP_OUTER_ARRAY = FALSE,
 SKIP_BYTE_ORDER_MARK = TRUE
 );
- For the URL, you will need to view the Export Table Paths in Matomo > Administration
 > Export > Data Warehouse Connector. The S3 path is listed for each Matomo table, e.g.,
 s3://prod-processed-customer-exports/demo.matomo.cloud-xxxxx.../site/ - Note: The Export Table Paths in Matomo include a trailing
*for example,s3://prod-processed…/site/*. This must be removed when pasting the path into Snowflake. - For Credentials, enter the AWS Key ID and AWS Secret Key. The credentials are generated in the Matomo Data Warehouse Connector page.
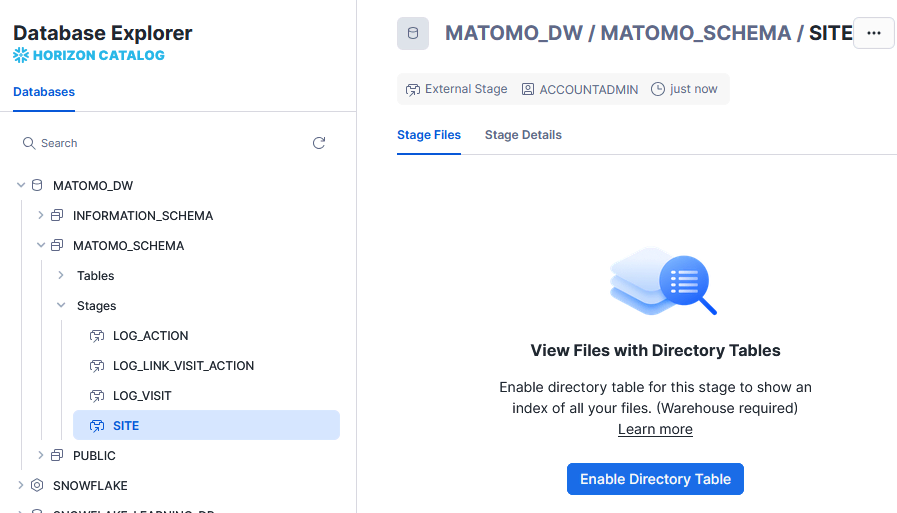
4. Enable Directory Table
When you create an external stage in Snowflake, it points to a folder in Amazon S3 but doesn’t automatically list its contents. Enabling the Directory Table allows Snowflake to maintain an internal catalog of all the files available in that stage.
- After creating all the stages for your Matomo tables, open Catalog > Database Explorer.
- Click on the new Stage name to open and if prompted, select the option, Enable Directory Table.
5. Load data into Snowflake tables
Matomo exports selected tables to Amazon S3 in JSON Lines (JSONL) format. The exported data is organised into folders within your S3 bucket, and you access these folders through external stages. Once your tables and stages are created, you can load the data from each stage into its corresponding table.
- Click the plus icon + and select SQL file.
- Use the
COPY INTOcommand to load data from the stage into your Snowflake table. - Example of the COPY command with timestamp parsing (handles microseconds / ISO
T/Z):
COPY INTO MATOMO_DW.MATOMO_SCHEMA.SITE
(
  sitesearch_category_parameters,
  sitesearch_keyword_parameters,
  excluded_user_agents,
  excluded_parameters,
  keep_url_fragment,
  exclude_unknown_urls,
  creator_login,
  excluded_ips,
  ecommerce,
  type,
  idsite,
  timezone,
  ts_created,           -- TIMESTAMP_NTZ
  sitesearch,
  currency,
  main_url,
  excluded_referrers,
  "GROUP",
  name
)
FROM (
  SELECT
    $1:sitesearch_category_parameters::STRING,
    $1:sitesearch_keyword_parameters::STRING,
    $1:excluded_user_agents::STRING,
    $1:excluded_parameters::STRING,

    TRY_TO_NUMBER(TO_VARCHAR($1:keep_url_fragment)),
    TRY_TO_NUMBER(TO_VARCHAR($1:exclude_unknown_urls)),

    $1:creator_login::STRING,
    $1:excluded_ips::STRING,
    TRY_TO_NUMBER(TO_VARCHAR($1:ecommerce)),
    $1:type::STRING,
    TRY_TO_NUMBER(TO_VARCHAR($1:idsite)),
    $1:timezone::STRING,

    /* Timestamp playbook: ISO first, then plain with microseconds */
    COALESCE(
      TRY_TO_TIMESTAMP_TZ(TRIM($1:ts_created::STRING))::TIMESTAMP_NTZ,
      TRY_TO_TIMESTAMP_NTZ(
        REPLACE(REPLACE(TRIM($1:ts_created::STRING), 'T', ' '), 'Z', ''),
        'YYYY-MM-DD HH24:MI:SS.FF'
      )
    ),

    TRY_TO_NUMBER(TO_VARCHAR($1:sitesearch)),
    $1:currency::STRING,
    $1:main_url::STRING,
    $1:excluded_referrers::STRING,
    $1:"group"::STRING,
    $1:name::STRING
  FROM @MATOMO_DW.MATOMO_SCHEMA.SITE
)
ON_ERROR = 'CONTINUE'
FORCE    = TRUE;
6. Verify the import
Once the first scheduled export has completed, you can check data was successfully loaded into Snowflake. For example, run a basic SQL query: SELECT * FROM MATOMO_DW.MATOMO_SCHEMA.SITE LIMIT 100;
Once your Matomo data has been imported into Snowflake, you can start building queries and dashboards. If you need historic data, configure a backfill in Matomo before running your first import. With the Data Warehouse Connector set up correctly, Snowflake becomes a central hub for analysing Matomo data alongside your other datasets.
Explore frequently asked questions about the Data Warehouse Connector.